In this article, I will be guiding you step by step in creating a test automation framework using Playwright, Spring boot, Java, Cucumber and Junit5. Additionally, I will explain about Aspect Oriented Programming (AOP) for cross-cutting features (like logging) and using Lombok annotations for simplification and enhancing readability of the code.
What do you need before starting?
I always recommend to use latest tech to explore full potentials of various software's. Its absolutely fine if someone disagrees with this approach 😃
- A 64 bit system with at least 4GB RAM (8 GB preferred).
- MacOS - Monterey or Windows 10 and above
- Java 11 or above installed
- IntelliJ Community edition (latest version preferred) installed
- Docker Desktop installed
How to create a Spring boot project?
The simplest way, is to visit this site: https://start.spring.io/, then select from the available options, enter value for Group, remember this will become your parent package. Based on your requirement, you may decide to enter Artifact, Name, Description.

experiment with "Gradle-Groovy" you are most welcome, do leave a comment and let me know if you faced any issue, it will help me gain some knowledge.
For Language, I have selected Java, as our objective is to write code using java. It is recommended to use latest Spring Boot version, as it will always have new features in it.
Packaging type "Jar" is selected by default, and I don't have any objective to change it, so left it as is. Java version also I left as is.
You might have noticed, there is an option to add dependencies:

This is a useful option, through which we can add a lot of needed dependencies for spring boot , which will be automatically added to the maven pom file, once we click on the "Generate" link.
I will be adding Lombok dependency as follows:
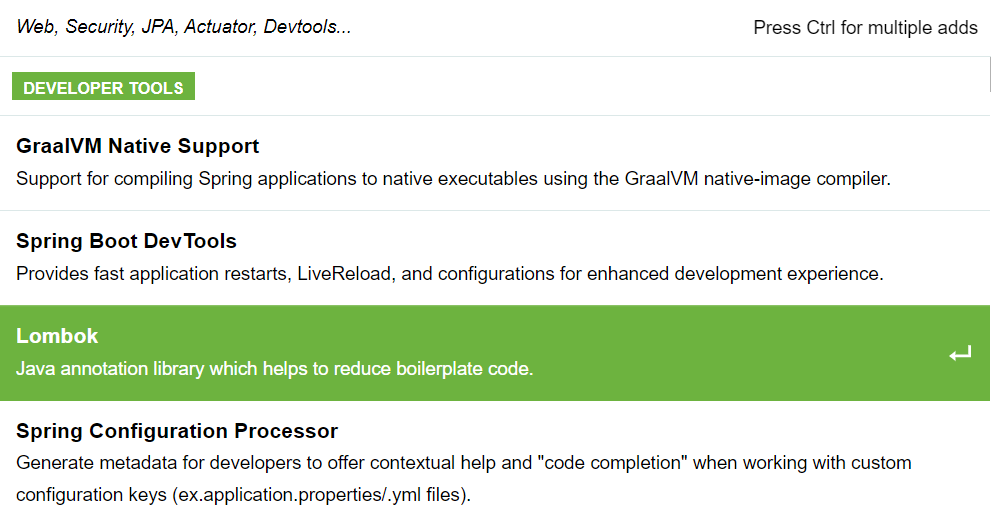
Now, you can see that Lombok has been selected as a dependency:

Now you are ready to create the project. Click "Generate" button. It will automatically download the project skeleton as a zip file. The file name will be as per the "Name" parameter which you have passed.


This is how the project folders will look like. Until unless, you are planning to create some Micro-services for your hands on with Playwright API testing, you may remove the "main" folder from the project, before importing it as a maven project in IntelliJ.
What maven dependencies do we need to add?
- Cucumber-java
- Cucumber-spring
- Cucumber-junit-platform-engine
- Playwright
- junit-platform-suite
- Commons-lang3
- aspectjweaver
You can refer to the Maven POM file: POM
Now, I will explain how to create Playwright browser using factory design pattern. The code is available in my GitHub repository: PlaywrightTestAutomationFramework
Step 1:
Create a package (folder), called configuration and park your Cucumber and Spring configuration classes in it.
import io.cucumber.spring.CucumberContextConfiguration;
import org.springframework.test.context.ContextConfiguration;

@CucumberContextConfiguration
@ContextConfiguration(classes={TestConfig.class})
public class CucumberContextConfig {

}
@Configuration
@EnableAspectJAutoProxy
@ComponentScan("springboot.playwright.cucumber")
public class TestConfig {

}
Step 2:
Create a package (folder) to park all interfaces and classes that are responsible for creating and supplying Playwright bean. Next, create a Java Interface, which will supply the playwright browser factory bean:

Here, I have created some method definitions.
setPlaywrightBrowser(String browserType) method will take the browser type as input, say Chrome/Firefox etc. and will initialize the Playwright browser context (native to Playwright).
getPlaywrightBrowser() method will return the playwright bean browser context.
setPlaywrightBrowserContext(), getPlaywrightBrowserContext(), setPlaywrightPage() and getPlaywrightPage() methods are created for support purposes, in case the user need to access these from the factory bean. setTracing(Boolean) and isTracingOptionSet() are also support methods, to turn the browser tracing on/off.
Now, create a class that will implement the interface:
The first line within the class is very important: Playwright playwright = Playwright.create();
The rest of the code is self-explanatory, carefully read and understand how it Overrides the PlaywrightBrowser interface, created in Step 1 above.
import com.microsoft.playwright.*;
import java.util.Objects;
import java.nio.file.Path;
import java.nio.file.Paths;
import java.time.LocalDateTime;
import java.time.format.DateTimeFormatter;
import java.util.Optional;

@SuppressWarnings({"unused","cast"})
public class PlaywrightBrowserSupplier implements PlaywrightBrowser {
    Playwright playwright = Playwright.create();
    Browser browser;
    BrowserContext browserContext;
    Page page;
    //This boolean value is used for introducing Playwright tracing
    Boolean isTracingSet=false;

    public PlaywrightBrowserSupplier(String BrowserType, Optional<Boolean> tracingOption){
        setPlaywrightBrowser(BrowserType);
        //This method checks the optional tracingOption value and accordingly turns on
        // Playwright browser tracing
        setTracing(tracingOption.orElse(false));
    }

    /** This method will initialize the PlaywrightBrowser bean (Facade design pattern)
     * with appropriate browser type
     * Author: Susnigdha Chatterjee
     */
    @Override
    public void setPlaywrightBrowser(String browserType)
    {
        switch(browserType.toLowerCase()) {
            case "chrome":
                //Below line will launch chrome browser in non-headless mode
                //browser = playwright.chromium().launch(new BrowserType.LaunchOptions()
                // .setHeadless(false));
                //If you wish to execute the code in Headless mode then please un comment
                // below line*/
                browser = playwright.chromium().launch();
                break;
            case "firefox":
                browser = playwright.firefox().launch();
                break;
        }
        setPlaywrightBrowserContext();
        setPlaywrightPage();
    }

    @Override
    public Browser getPlaywrightBrowser() {
        return browser;
    }

    @Override
    public void setPlaywrightBrowserContext() {
        browserContext=getPlaywrightBrowser()
                .newContext();
    }

    @Override
    public BrowserContext getPlaywrightBrowserContext() {
        return browserContext;}

    @Override
    public void setPlaywrightPage(){
        page=getPlaywrightBrowserContext().waitForPage(()->getPlaywrightBrowserContext()
                .newPage());
    }

    /**This method will help to retrieve the Playwright page from the PlaywrightBrowser bean
     */
    @Override
    public Page getPlaywrightPage(){
        return page;
    }

    @Override
    public void close() {
        page.close();
        browserContext.close();
        playwright.close();
    }

    /**
     * This method will be called from Hooks class, from cucumber After hook
     * @author Susnigdha Chatterjee
     * @return byte array which holds the screenshot
     */
    @Override
    public byte[] captureScreenshot(){
        Path objPath = Paths.get("target/screenshots/Screenshot_"+ LocalDateTime.now()
                .format(DateTimeFormatter.ofPattern("ddMMyy_hhmmss"))+".png");
        return page.screenshot(new Page.ScreenshotOptions().setPath(objPath)
                .setFullPage(true));
    }

    /**
     * This method will be called from Constructor to set the Playwright browser tracing on
     * @author Susnigdha Chatterjee
     * @return byte array which holds the screenshot
     */
    @Override
    public void setTracing(Boolean option){
        if(option && !Objects.isNull(browserContext)){
            browserContext.tracing().start(new Tracing.StartOptions()
                    .setSnapshots(true));
            isTracingSet = true;
        }
    }
    /**
     * This method will be called from Hooks class's After annotation to decide if
     * Playwright browser tracing needs to be turned off
     * @author Susnigdha Chatterjee
     * @return byte array which holds the screenshot
     */
    @Override
    public boolean isTracingOptionSet(){
        return isTracingSet;
    }
}
Finally. create a "Configuration" class, that will be responsible for creating the factory bean. Pay attention to the annotations used. @Configuration will inform Spring that it has Bean definitions. @Slf4j annotation comes from Lombok, which will use Spring's default Log Back mechanism to generate console logs. @SupressWarnings will suppress the listed unwanted warnings. @Bean annotation indicates that the method will create a bean and @ScenarioScope will indicate that this bean will be available across Cucumber scenarios. Rest of the code is self-explanatory, you need to read :) . Do leave a comment for any doubts.
import io.cucumber.spring.ScenarioScope;
import lombok.extern.slf4j.Slf4j;
import org.springframework.context.annotation.Bean;
import org.springframework.context.annotation.Configuration;
import java.util.Optional;

/**
 * Using factory design pattern. The PlaywrightBrowser interface serves as the factory.
 * PlaywrightBrowserSupplier implements the PlaywrightBrowser interface based on
 * the browser type supplied using the browserType parameter of
 * testconfigurations.properties file
 */

@Configuration
@Slf4j
@SuppressWarnings({"unused","cast"})
public class PlaywrightInitializer {
    /** Using Facade design pattern to initialize Playwright page using
     *  custom built PlaywrightBrowser interface
     * @author Susnigdha Chatterjee
    */
   @Bean(name="PlaywrightBrowser", destroyMethod = "close")
   @ScenarioScope
   public PlaywrightBrowser init() {
       //Creating the bean of type PlaywrightBrowser using its implementing
       // class PlaywrightBrowserPage
       log.info("Creating PlaywrightBrowser bean");
       //Added new Optional parameter to the constructor method
       return new PlaywrightBrowserSupplier(System.getProperty("browser"),
               Optional.of(Boolean.valueOf(System.getProperty("tracing"))));
   }
}
Step 3:
Create a package to park your Cucumber hooks, and place related classes in it. In this example class, I am attaching screenshots for each cucumber scenario, and also determining if we need to stop tracing.
import com.microsoft.playwright.Tracing;
import io.cucumber.java.Scenario;
import lombok.extern.slf4j.Slf4j;
import springboot.playwright.cucumber.playwright.PlaywrightBrowser;
import io.cucumber.java.After;

import java.nio.file.Paths;

@Slf4j
public class hooks {
  PlaywrightBrowser playwrightBrowser;
    hooks(PlaywrightBrowser browser) {
        this.playwrightBrowser=browser;
    }

    @After
    public void afterScenario(Scenario scenario)
    {
        //Capturing screenshot irrespective of whether the test pass or fail
        //This approach will ensure there is always evidences for the tests outcome
        scenario.attach(playwrightBrowser.captureScreenshot(),
                "image/png","screenshot");
        log.debug("Attaching full page screenshot, after the scenario");

        if(playwrightBrowser.isTracingOptionSet()) {
            playwrightBrowser.getPlaywrightBrowserContext().tracing()
                    .stop(new Tracing.StopOptions()
                    .setPath(Paths.get("target/traces.zip")));
        }
    }
}
Step 4:
Create a package to park your Cucumber Junit5 runners:
Pay attention to the annotations used. Also look into the setUp method, from this method we will set system properties, which will be used by the PlaywrightInitializer class, we created earlier.
import io.cucumber.java.Before;
import lombok.extern.slf4j.Slf4j;
import org.junit.platform.suite.api.ConfigurationParameter;
import org.junit.platform.suite.api.IncludeEngines;
import org.junit.platform.suite.api.SelectClasspathResource;
import org.junit.platform.suite.api.Suite;

@Suite
@IncludeEngines("cucumber")
@SelectClasspathResource("/features")
@ConfigurationParameter(key="cucumber.plugin",
        value = "html:target/CucumberTestExecutionReport_Chrome.html")
@Slf4j
public class runnerChrome {
    @Before
    public void setUp() {
        //You could pass these property values using application.properties file also.
        //I am writing it in this way to make it easy to understand for those who have
        // less technical knowledge
        //and willing to learn and experiment more
        System.setProperty("browser","chrome");
        System.setProperty("tracing", String.valueOf(true));
        log.info("Passing browser property to PlaywrightBrowser bean");
    }
}
For cross browser execution, create another runner class and set the browser property to a different browser.
Step 5:
Create two package, one for Step Definitions and the other for PageObjects, then add the needed classes.
Checkout: stepDefinitions, pageObjects
Step 6:
Create a package for AOP, and park related classes in it:
The @Aspect and @Component annotation makes this class as an aspect. The @Before annotation is defined with a point cut, that will attach to all the methods of pageObjects.PageObject class. The associated JoinPoint will then be used to log the method signatures. It describes how to create common logging. The @Around annotation is defined with a point cut on Playwright's native package to capture and throw any exception, this is kept as an example to show that we can write custom exception handlers using AOP
import io.cucumber.spring.ScenarioScope;
import lombok.extern.slf4j.Slf4j;
import org.aspectj.lang.JoinPoint;
import org.aspectj.lang.ProceedingJoinPoint;
import org.aspectj.lang.annotation.Around;
import org.aspectj.lang.annotation.Aspect;
import org.aspectj.lang.annotation.Before;
import org.springframework.stereotype.Component;

@Aspect
@Slf4j
@Component
@ScenarioScope
public class CommonLogger {
    @Before("execution(* springboot.playwright.cucumber." +
            "pageObjects.PageObject.*(..))")
    public void putCommonLog(JoinPoint joinPoint) {
        log.debug("Invoking this method from PageObject class instance: "
                + joinPoint.getSignature().getName());
    }

    @Around("execution(* com.microsoft.playwright.*.*(..))")
    public Object exceptionHandlerWithReturnType(ProceedingJoinPoint joinPoint)
            throws Throwable{
        Object obj;
        obj = joinPoint.proceed();
        return obj;
    }
}
If you have followed the contents so far and also checked out the associate GitHub repository, then I am sure you have learned step by step how to design a test automation framework, using Playwright, Spring boot, Java, Cucumber and Junit5.


